Photobucket Photobucket Photobucket Photobucket Photobucket Photobucket Photobucket Photobucket Photobucket Photobucket Photobucket Photobucket Photobucket

Sponsor Shout Out!

I think my sponsors have GREAT things to offer, and I’m so thankful to be able to partner with them another month!!  I would totally love it if you would take a second to check them out… and I know they would love it too!

sponsor-love_thumb1_thumb

tree-post-divider_thumb1_thumb

Baubles by Design is a new sponsor and old friend of mine, Beth Anne!  She has a passion for creating handmade jewelry… that’s affordable!

baubles by design

You will find high-quality jewelry for any occasion—gifts, formal, casual—at reasonable prices. Every piece is individually hand-crafted too!

Baulbes-logo_store

If you haven’t already, check out the story of how Beth got started with her own jewelry

It all started in 2001 when my cousin took me to a sterling silver shop while I was visiting family in Georgia.  This particular shop had a small area set up where you could design and learn to make your own bracelet using a mixture of glass and sterling beads.  It was just $20 to do it, so we both decided to try it out.  I was hooked from the very beginning.  Just the thought of designing my own piece had me all excited!!  I still have that first bracelet and I still love it!

There are tons of pieces to choose from in her store, or you can actually order a custom designed piece.  Believe it or not, you can actually even send in a picture of the outfit you want to wear, and Beth will create a special piece designed just with that in mind.  Is that crazy or what?

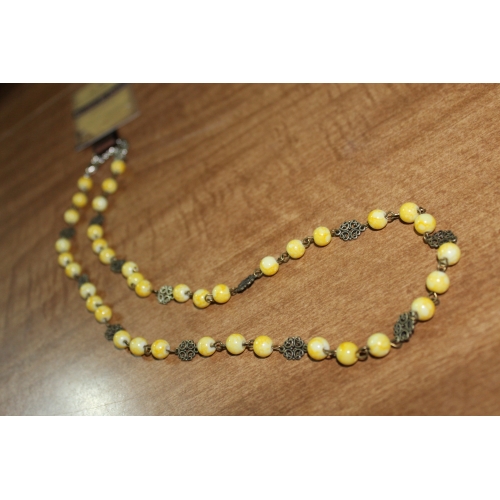
Here is a fun necklace.… only $12!


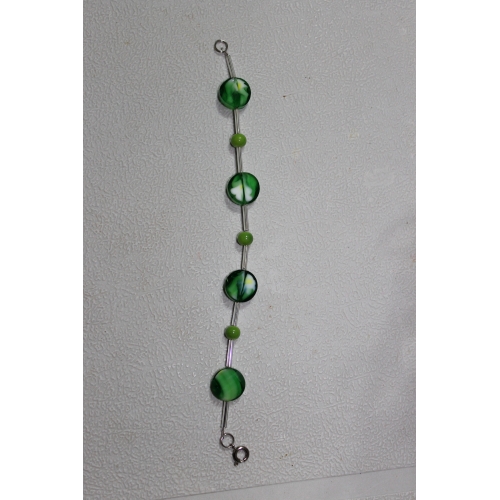
Check out this great green bracelet


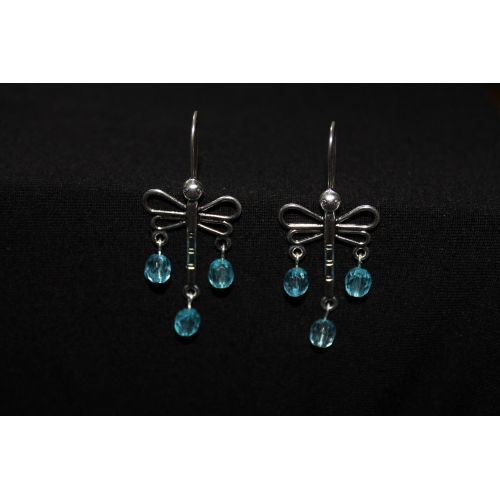
These dragonfly-esqu earrings are so cute!  And only $5.50!

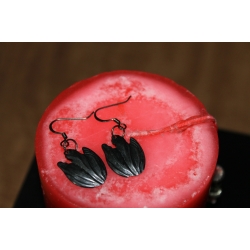
These great black earrings are only $5!

I would love it if you would pop over and check out her cool stuff!

baubles by design

tree-post-divider_thumb1_thumb

make5dinnersin1hour_thumb_thumb

Summertime is pretty much officially here for most of us!  Whoohoo!  But along with all the summer fun is lots of summer busyness which leaves little time for fixing nutritious home cooked meals!  But that horrid dinnertime stress can be alleviated with the right planning and prepping, you know!

Michelle from Make 5 Dinners in 1 Hour has such a great system!  She is my inspiration for starting this amazing weekly meal prep lifestyle.  I think it really is a lifestyle, in a way, since it is such a different way of cooking.

She offers you THREE months of Meals complete with recipes AND grocery lists for only $15!

Her grocery lists are even organized by store section and labeled so you can see which recipe each ingredient goes with.  That way you can easily customize the items you’ll need at the store!

Michelle is also offering you all a fab deal!  Subscribe here and get your first three months for only $12!

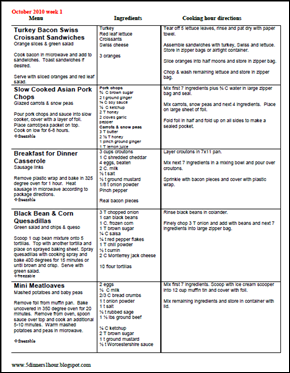
Don’t forget you can also get a ONE week Sample Menu available for FREE to give it a try!

5dinnerssamplemenu6_thumb

See how it’s broken down so well??

One reason I love her recipes so much is she is a woman after my own heart!  She loves the easy but delicious theme too!

She has a new Clean Eating Ebook out too!

And doesn’t this Tomato Corn & Shrimp Salad look SO good?


Yum, yum!!

And I love this idea for your own burrito bar too!


You can’t tell me the family wouldn’t get excited about that right??

Her weekly prep plan has made such a difference for us, and I think it can for you too!

5dinners1hour_thumb2_thumb

If you’ve been toying with the idea… NOW is the time!  Check out her blog to learn even more.


tree-post-divider_thumb2_thumb

mymemories_thumb_thumb

mymemoriesbutton5_thumb1_thumb

My Memories is some pretty sweet digital scrapbooking software perfect for your scrapping needs.

Since Picnik died, I’ve even been using it to do my own printables, business cards, and lots of fun things for school next year!  It’s SO EASY TO USE!

Don’t let the mountain of unprinted pics filling up the hard drive of your computer keep growing!  Digital Scrapbooking  is a great way to actually achieve your scrapbooking goal without losing your sanity and emptying your pocketbook.

I’m excited to be able to to scrap with it and plan to print out my 12×12 pages using Persnickety Prints.  They print full color pages for only $1.99!

You can use the code STMMS99903 to get $10 off the $40 software package PLUS a$10 credit to use in the My Memories store to splurge on fun extras for your digi scrapping!

Digital Scrapping is a great alternative in our crazy BUSY lives… It’s a great way to try to stay on TOP of the ever growing pile of priceless pics!

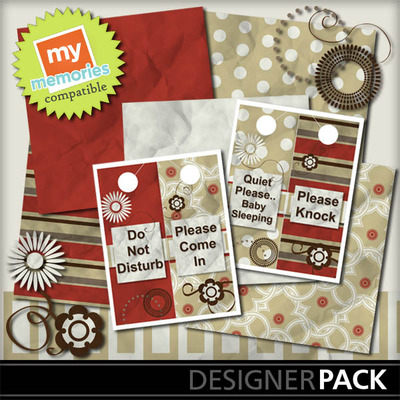
Here is a great digi scrapping FREEBIE available for a limited time!


Here’s the tutorial on how to make this cute free door hanger!

Using MyMemories Software to Customize your Doorknob Hanger

  1. Download template file and install it into your software
  2. Using MyMemories Suite, choose Create Album From Designer Template and find your project
  3. Now you can add pictures, print and enjoy the provided template, or customize it with your own papers and embellishments.

TIP:
You can right-click on the white guide and lock it in place to keep it from moving while you are working. Make sure this is the top layer of your project before printing.

Instead of adding the paper as a background paper, you can add it as an embellishment so that you can move the paper around.  This is especially useful when using papers with stripes or circles, so you can decide which part of the paper you want to use.

Once it is added as an embellishment, you can now select the paper and move it into the position you want it.

Just SAVE and PRINT on cardstock!

Doorknob Hanger Tutorial
1.  Print your doorknob templates on cardstock and gather supplies.  (Recommended supplies: bone folder, craft knife, cutting mat, metal edged ruler, small scissors, tape runner)


gather supplies

2.  Using the craft knife and metal edged ruler cut along outside line.
TIP: a paper cutter could be used as an alternative


trim edge

3.  Repeat on all four sides.


trim all edges

4.  Using a bone folder, fold the doorknob hanger in half.


5.  Apply a liberal amount of the glue of your choice and glue sides together.
TIP: A tape runner works better than a glue stick!


glue together

6.  Using small scissors, cut out the white center circle.


cut out circle

7.  Hang on a door and Enjoy!!
TIP: To make your doorknob hanger last longer, it is best to laminate your project.  Clear contact paper makes great Do-It-Yourself lamination.


finished project

Cute, right??

A great big THANK YOU again from me to ALL my SPONSORS!!!  You’re the best!

tree-post-divider_thumb2_thumb

One Response to Sponsor Shout Out!
  1. Very nice post. I just stumbled upon your blog and wanted to say that I have really enjoyed browsing your blog posts.
    After all I will be subscribing to your rss feed and I hope you write again soon!

Sponsor Shout Out!

I think my sponsors have GREAT things to offer, and I’m so thankful to be able to partner with them another month!!  I would totally love it if you would take a second to check them out… and I know they would love it too!

sponsor-love_thumb1_thumb

tree-post-divider_thumb1_thumb

Baubles by Design is a new sponsor and old friend of mine, Beth Anne!  She has a passion for creating handmade jewelry… that’s affordable!

baubles by design

You will find high-quality jewelry for any occasion—gifts, formal, casual—at reasonable prices. Every piece is individually hand-crafted too!

Baulbes-logo_store

If you haven’t already, check out the story of how Beth got started with her own jewelry

It all started in 2001 when my cousin took me to a sterling silver shop while I was visiting family in Georgia.  This particular shop had a small area set up where you could design and learn to make your own bracelet using a mixture of glass and sterling beads.  It was just $20 to do it, so we both decided to try it out.  I was hooked from the very beginning.  Just the thought of designing my own piece had me all excited!!  I still have that first bracelet and I still love it!

There are tons of pieces to choose from in her store, or you can actually order a custom designed piece.  Believe it or not, you can actually even send in a picture of the outfit you want to wear, and Beth will create a special piece designed just with that in mind.  Is that crazy or what?

Here is a fun necklace.… only $12!


Check out this great green bracelet


These dragonfly-esqu earrings are so cute!  And only $5.50!

These great black earrings are only $5!

I would love it if you would pop over and check out her cool stuff!

baubles by design

tree-post-divider_thumb1_thumb

make5dinnersin1hour_thumb_thumb

Summertime is pretty much officially here for most of us!  Whoohoo!  But along with all the summer fun is lots of summer busyness which leaves little time for fixing nutritious home cooked meals!  But that horrid dinnertime stress can be alleviated with the right planning and prepping, you know!

Michelle from Make 5 Dinners in 1 Hour has such a great system!  She is my inspiration for starting this amazing weekly meal prep lifestyle.  I think it really is a lifestyle, in a way, since it is such a different way of cooking.

She offers you THREE months of Meals complete with recipes AND grocery lists for only $15!

Her grocery lists are even organized by store section and labeled so you can see which recipe each ingredient goes with.  That way you can easily customize the items you’ll need at the store!

Michelle is also offering you all a fab deal!  Subscribe here and get your first three months for only $12!

Don’t forget you can also get a ONE week Sample Menu available for FREE to give it a try!

5dinnerssamplemenu6_thumb

See how it’s broken down so well??

One reason I love her recipes so much is she is a woman after my own heart!  She loves the easy but delicious theme too!

She has a new Clean Eating Ebook out too!

And doesn’t this Tomato Corn & Shrimp Salad look SO good?


Yum, yum!!

And I love this idea for your own burrito bar too!


You can’t tell me the family wouldn’t get excited about that right??

Her weekly prep plan has made such a difference for us, and I think it can for you too!

5dinners1hour_thumb2_thumb

If you’ve been toying with the idea… NOW is the time!  Check out her blog to learn even more.


tree-post-divider_thumb2_thumb

mymemories_thumb_thumb

mymemoriesbutton5_thumb1_thumb

My Memories is some pretty sweet digital scrapbooking software perfect for your scrapping needs.

Since Picnik died, I’ve even been using it to do my own printables, business cards, and lots of fun things for school next year!  It’s SO EASY TO USE!

Don’t let the mountain of unprinted pics filling up the hard drive of your computer keep growing!  Digital Scrapbooking  is a great way to actually achieve your scrapbooking goal without losing your sanity and emptying your pocketbook.

I’m excited to be able to to scrap with it and plan to print out my 12×12 pages using Persnickety Prints.  They print full color pages for only $1.99!

You can use the code STMMS99903 to get $10 off the $40 software package PLUS a$10 credit to use in the My Memories store to splurge on fun extras for your digi scrapping!

Digital Scrapping is a great alternative in our crazy BUSY lives… It’s a great way to try to stay on TOP of the ever growing pile of priceless pics!

Here is a great digi scrapping FREEBIE available for a limited time!


Here’s the tutorial on how to make this cute free door hanger!

Using MyMemories Software to Customize your Doorknob Hanger

  1. Download template file and install it into your software
  2. Using MyMemories Suite, choose Create Album From Designer Template and find your project
  3. Now you can add pictures, print and enjoy the provided template, or customize it with your own papers and embellishments.

TIP:
You can right-click on the white guide and lock it in place to keep it from moving while you are working. Make sure this is the top layer of your project before printing.

Instead of adding the paper as a background paper, you can add it as an embellishment so that you can move the paper around.  This is especially useful when using papers with stripes or circles, so you can decide which part of the paper you want to use.

Once it is added as an embellishment, you can now select the paper and move it into the position you want it.

Just SAVE and PRINT on cardstock!

Doorknob Hanger Tutorial
1.  Print your doorknob templates on cardstock and gather supplies.  (Recommended supplies: bone folder, craft knife, cutting mat, metal edged ruler, small scissors, tape runner)


gather supplies

2.  Using the craft knife and metal edged ruler cut along outside line.
TIP: a paper cutter could be used as an alternative


trim edge

3.  Repeat on all four sides.


trim all edges

4.  Using a bone folder, fold the doorknob hanger in half.


5.  Apply a liberal amount of the glue of your choice and glue sides together.
TIP: A tape runner works better than a glue stick!


glue together

6.  Using small scissors, cut out the white center circle.


cut out circle

7.  Hang on a door and Enjoy!!
TIP: To make your doorknob hanger last longer, it is best to laminate your project.  Clear contact paper makes great Do-It-Yourself lamination.


finished project

Cute, right??

A great big THANK YOU again from me to ALL my SPONSORS!!!  You’re the best!

tree-post-divider_thumb2_thumb

One Response to Sponsor Shout Out!
  1. Very nice post. I just stumbled upon your blog and wanted to say that I have really enjoyed browsing your blog posts.
    After all I will be subscribing to your rss feed and I hope you write again soon!