Photobucket Photobucket Photobucket Photobucket Photobucket Photobucket Photobucket Photobucket Photobucket Photobucket Photobucket Photobucket Photobucket

Guest Post… Centsible Savings!

I am happy to welcome my friend, Christina, from Centsible Savings who is here today to entertain us!
I’ve known Christina since she began attending our church her freshman year of college many, many moons ago!  She started college the year after I graduated, but we we served in children’s ministries together. 
I love to read her Décor on a Dime posts about how she finds not so grand things second hand for CHEAP and transforms them into marvelous beauties!!! 
Thanks, Christina!

~~~~~~~~~~~~~~~~~~~~~~~~~~~~~~~~~~~~

I am excited to be guest posting for Renee while she is off enjoying DISNEY with her family. Can’t wait to hear all about her trip! (She guest posted for me when my husband and I were at Disney earlier this summer, so I am glad I could return the favor :)

My name is Christina and I blog all about coupons, shopping deals, frugal meals, and even my fun yard sale finds and frugal home décor over at Centsible Savings.

Renee was actually the one who inspired me to start couponing back in 2007. Which led to me eventually starting blogging all about coupons… Then, pretty sure it was her again that introduced me to Sarah’s blog and I fell in LOVE with the world of frugal decor blogs. (Thanks, Renee for all your inspiration ;) I have even started doing Renee’s 5 dinners in 1 hour plan, so I guess whatever Renee does, I eventually end up doing too (although I did go to Disney FIRST this summer :)

But back to our project…

Today I am excited to share a very frugal, fun, and even somewhat fall-ish themed project with you. This is one of my all – time – FAVES of any DIY projects that I have done.

DSC_0217

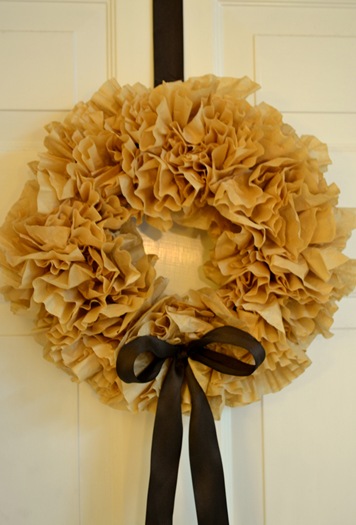
Can you guess what it is made of….??? If you guessed coffee filters, you are right! :)

Here’s what you need:

DSC_0210

  • Coffee filters (white or brown) – mine were 79¢ from the grocery store
  • a foam wreath – mine cost 33¢ (see below)
  • glue gun and glue sticks

I used to use hard foam wreaths (like the one in picture below) from Dollar Tree. Then, much to my dismay, they discontinued them last year. :(

make coffee wreath

Then I saw this tip on Pinterest

Buy a 6 foot long piece of foam tubing from the plumbing department at your local hardware store. Cost – 97¢. Cut it into desired length (I cut my pipe into three, 3-foot lengths giving me 3 wreaths out of 1 pipe) and tape ends together. 33¢ foam wreath or $3.99-4.99 foam wreaths from the craft store – hmm … not a hard decision for me.

So now on to making your wreath. Separate your coffee filters and and lay a bunch out for you to grab. Some people fold their individual coffee filters a certain way, I just sort of crinkled the end of mine up a little, dotted it with hot glue, and stuck it on to the wreath.

making coffee filter wreath

Crinkle, glue, repeat… filling in the wreath as you go around. You don’t have to put them on the back, just the sides and the front filling in any extra space. I used about 100 filters on this wreath.

And eventually (after adding a bow if you wish) this is what you will end up with!
DSC_0213

I hung mine in my kitchen on the door leading to the garage. (Cause you need something to enjoy on the inside of your doors too.)

DSC_0215

Perfect for fall or anytime! (You could add some cute wood letters spelling out “fall” to really make it fall themed.)

DSC_0216

Mine stays up all year and I love it!

Here it is in my kitchen right after I made it last fall. (I also made the pumpkin topiary you see on the table – go here for that tutorial.)

coffee filter wreath in kitchen

By the way, these could make a great gifts.

And there are so many possibilities:

  • a white coffee filter wreath with a red bow for Christmas,
  • dye or paint white coffee filters red or pink for Valentines Day (maybe glued on to a heart shaped foam wreath),
  • dye filters red and blue and alternate with white on a wreath for 4th of July,
  • and so much more!

So pick up some extra coffee filters at the grocery store and some foam pipe at the hardware store and get to crafting! :)

Thanks, Renee! and have a ton of fun at Disneyworld!

~~~~~~~~~~~~~~~~~~~~~~~~~~~~~~~~~~~~

So cute, Christina! I fully agree about decorating the INSIDE of the door as well as the outside! And… really… a custom wreath for UNDER TWO BUCKS??? WOW!

That is too funny about ME being her inspiration, ha ha! It’s crazy how I got her into coupons, but I have ironically taken a coupon break, while SHE is now the Coupon Queen! :)

Thanks for sharing!!

Now, everyone go check out her blog and be inspired to do your own decorating… frugal style!!!!

smiley_face_bw-free_thumb1_thumb_thumb

4 Responses to Guest Post… Centsible Savings!
  1. Jolene
    September 8, 2011 | 7:40 pm

    Love it! I might just have to make one (or 2 or 3) of these. Thanks!!

  2. Kristle
    December 12, 2011 | 5:42 am

    I got the coffee filters today and I am so excited to make one! Thank you for posting DIY crafts on a thrifty budget! =)

  3. Renee@LivingLaughingLoving
    December 14, 2011 | 1:30 pm

    Awesome!! Hope it turns out great!! You should check out Christina's new blog http://thefrugalhomemaker.com/ with lots of more themed posts like this one!! :) I know she would love a visit. :)

  4. Some more 2011 highlights from Pinterest
    July 17, 2014 | 12:51 pm

    […] And Renee over at Living, Laughing and Loving sent over even more referrals from this guest post on my coffee filter wreath. […]

Guest Post… Centsible Savings!

I am happy to welcome my friend, Christina, from Centsible Savings who is here today to entertain us!
I’ve known Christina since she began attending our church her freshman year of college many, many moons ago!  She started college the year after I graduated, but we we served in children’s ministries together. 
I love to read her Décor on a Dime posts about how she finds not so grand things second hand for CHEAP and transforms them into marvelous beauties!!! 
Thanks, Christina!

~~~~~~~~~~~~~~~~~~~~~~~~~~~~~~~~~~~~

I am excited to be guest posting for Renee while she is off enjoying DISNEY with her family. Can’t wait to hear all about her trip! (She guest posted for me when my husband and I were at Disney earlier this summer, so I am glad I could return the favor :)

My name is Christina and I blog all about coupons, shopping deals, frugal meals, and even my fun yard sale finds and frugal home décor over at Centsible Savings.

Renee was actually the one who inspired me to start couponing back in 2007. Which led to me eventually starting blogging all about coupons… Then, pretty sure it was her again that introduced me to Sarah’s blog and I fell in LOVE with the world of frugal decor blogs. (Thanks, Renee for all your inspiration ;) I have even started doing Renee’s 5 dinners in 1 hour plan, so I guess whatever Renee does, I eventually end up doing too (although I did go to Disney FIRST this summer :)

But back to our project…

Today I am excited to share a very frugal, fun, and even somewhat fall-ish themed project with you. This is one of my all – time – FAVES of any DIY projects that I have done.

DSC_0217

Can you guess what it is made of….??? If you guessed coffee filters, you are right! :)

Here’s what you need:

DSC_0210

  • Coffee filters (white or brown) – mine were 79¢ from the grocery store
  • a foam wreath – mine cost 33¢ (see below)
  • glue gun and glue sticks

I used to use hard foam wreaths (like the one in picture below) from Dollar Tree. Then, much to my dismay, they discontinued them last year. :(

make coffee wreath

Then I saw this tip on Pinterest

Buy a 6 foot long piece of foam tubing from the plumbing department at your local hardware store. Cost – 97¢. Cut it into desired length (I cut my pipe into three, 3-foot lengths giving me 3 wreaths out of 1 pipe) and tape ends together. 33¢ foam wreath or $3.99-4.99 foam wreaths from the craft store – hmm … not a hard decision for me.

So now on to making your wreath. Separate your coffee filters and and lay a bunch out for you to grab. Some people fold their individual coffee filters a certain way, I just sort of crinkled the end of mine up a little, dotted it with hot glue, and stuck it on to the wreath.

making coffee filter wreath

Crinkle, glue, repeat… filling in the wreath as you go around. You don’t have to put them on the back, just the sides and the front filling in any extra space. I used about 100 filters on this wreath.

And eventually (after adding a bow if you wish) this is what you will end up with!

DSC_0213

I hung mine in my kitchen on the door leading to the garage. (Cause you need something to enjoy on the inside of your doors too.)

DSC_0215

Perfect for fall or anytime! (You could add some cute wood letters spelling out “fall” to really make it fall themed.)

DSC_0216

Mine stays up all year and I love it!

Here it is in my kitchen right after I made it last fall. (I also made the pumpkin topiary you see on the table – go here for that tutorial.)

coffee filter wreath in kitchen

By the way, these could make a great gifts.

And there are so many possibilities:

  • a white coffee filter wreath with a red bow for Christmas,
  • dye or paint white coffee filters red or pink for Valentines Day (maybe glued on to a heart shaped foam wreath),
  • dye filters red and blue and alternate with white on a wreath for 4th of July,
  • and so much more!

So pick up some extra coffee filters at the grocery store and some foam pipe at the hardware store and get to crafting! :)

Thanks, Renee! and have a ton of fun at Disneyworld!

~~~~~~~~~~~~~~~~~~~~~~~~~~~~~~~~~~~~

So cute, Christina! I fully agree about decorating the INSIDE of the door as well as the outside! And… really… a custom wreath for UNDER TWO BUCKS??? WOW!

That is too funny about ME being her inspiration, ha ha! It’s crazy how I got her into coupons, but I have ironically taken a coupon break, while SHE is now the Coupon Queen! :)

Thanks for sharing!!

Now, everyone go check out her blog and be inspired to do your own decorating… frugal style!!!!

smiley_face_bw-free_thumb1_thumb_thumb

4 Responses to Guest Post… Centsible Savings!
  1. Jolene
    September 8, 2011 | 7:40 pm

    Love it! I might just have to make one (or 2 or 3) of these. Thanks!!

  2. Kristle
    December 12, 2011 | 5:42 am

    I got the coffee filters today and I am so excited to make one! Thank you for posting DIY crafts on a thrifty budget! =)

  3. Renee@LivingLaughingLoving
    December 14, 2011 | 1:30 pm

    Awesome!! Hope it turns out great!! You should check out Christina's new blog http://thefrugalhomemaker.com/ with lots of more themed posts like this one!! :) I know she would love a visit. :)

  4. Some more 2011 highlights from Pinterest
    July 17, 2014 | 12:51 pm

    […] And Renee over at Living, Laughing and Loving sent over even more referrals from this guest post on my coffee filter wreath. […]