Photobucket Photobucket Photobucket Photobucket Photobucket Photobucket Photobucket Photobucket Photobucket Photobucket Photobucket Photobucket Photobucket

Beautify your Blog… How to Save your Picnik Faves

beautifyyourblog keep picnik 2

Last week on our DIY Blog Beautifying Journey, I promised a Picnik Loss Coping Tip, but first, here are all the AMAZING things we’ve covered so far…

Fabulous Fonts

DIY Quote Box

Dreamy Header

Adding a Custom Menu Bar

Sensational Signature w/Graphics

Sharing a Comment Pic thru Gravatar

Customized Sidebar Titles

Top WordPress Plugins

Easy Watermark Image

Promote your Blog with Email Siggy

Customized Favicon

I don’t know why google hates me, but for some reason, it seems they might!  They announced earlier this year that they were going to be closing Picnik and that sent all of blogland into a tither. 

Apparently it’s what all of us posers use to try to pretend that we’re as cool as those photoshop people.  :)

My sister keeps telling me I need to get on the Photoshop bandwagon, but it’s just so hard, dog-gone-it! 

I loved how easy picnik was! 

After the announcement, blog posts were flying about with recommendations on a picnik replacement complete with tutorials and examples.

But none of them came close to our beloved Picnik! 

In the spirit of capitalism, some supposedly former employees of Picnik saw the outcry and decided to start a very picnik-esque photo editing site… PicMonkey

I mentioned Monday how very similar it really is to Picnik… so much so that I’m scared that the giant google claws will stretch out and smash them before we even get a chance to  make use of it! 

One part of our pain in losing Picnik  is losing the easy access to all the extra fun embellishments that add a special touch especially when you are creating a button or graphic. 

I decided that I would join the revolution that the picmonkey peeps started and try to hang onto whatever Picnik goodness I can before it’s all gone.  :)

Ready to see exactly how to do that?

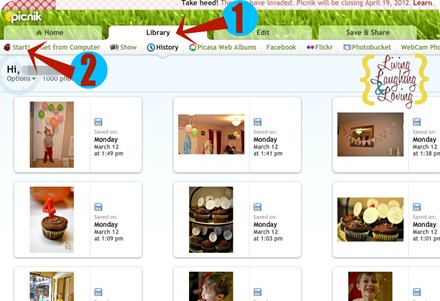
Step 1… Go to Picnik and open a collage.  They made this really hard to figure out since they added their ‘we’re closing’ page. Click on the Library tab, and then Start at the far left.

click library and start 2

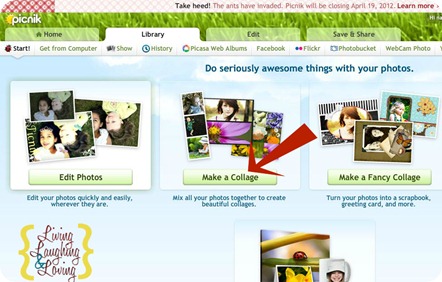
Then click Make a Collage.

click collage 2

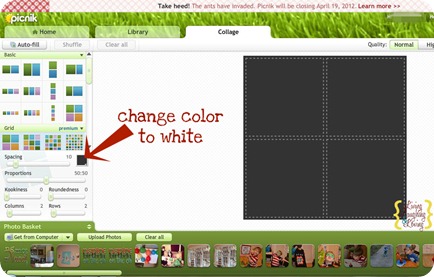
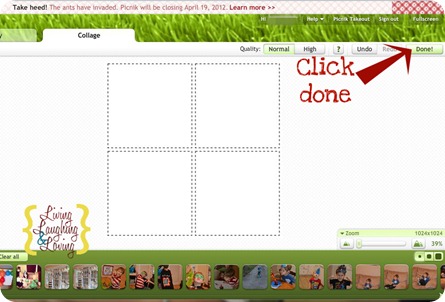
Change the color to white and click Done.

change color 2

Click done 2

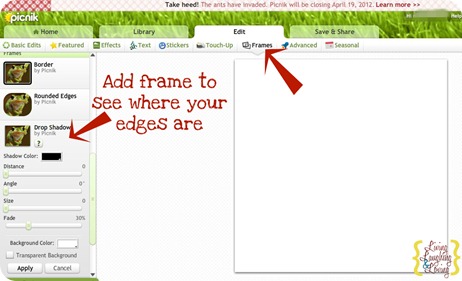
Step 2… Add a frame to see where your edges are.  This isn’t necessary of course, but makes it much easier.  Choose your frame and click apply.

add a frame 2

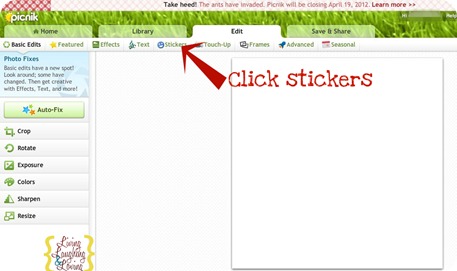
Step 3… Now click stickers to show all your many options.

click on stickers 2

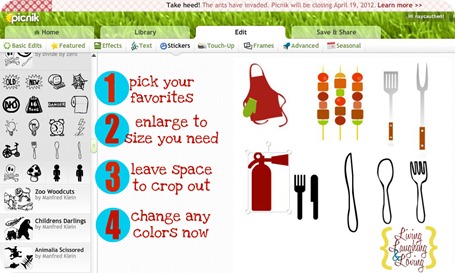
Pick your favorites and click away.  Obviously it’s not feasible to save ALL the stickers, but we can easily save some of our faves!

pick which stickers to save 2

Remember to enlarge them as big as you’ll think you may need them.  You can always go smaller, but it ain’t so easy to go bigger.

You should also leave plenty of room around each one too, so you’ll be able to crop easily later, and don’t forget to change any colors now.

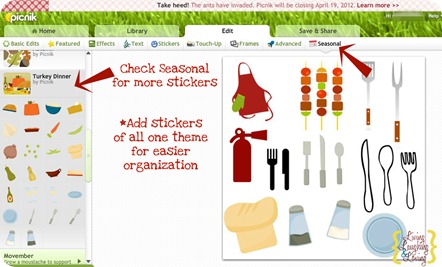
Step 4… Check the seasonal sections for more super stickers.  I grouped like ones together too for easier organization.

click on seasonal for more stickers 2

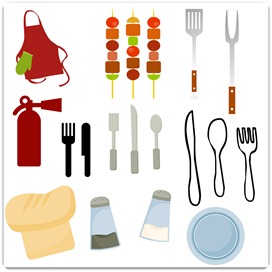
Do you like how I added the fire extinguisher for my cooking theme?  :)

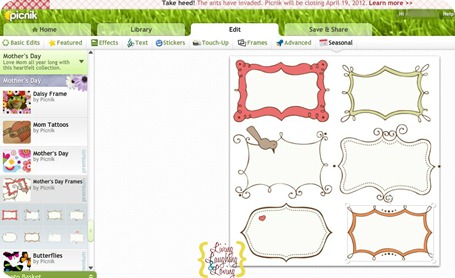
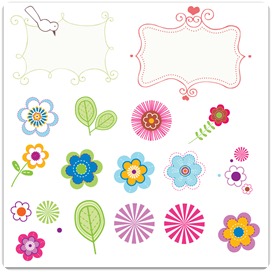
Some of my other faves are the Mother’s Day frames and flowers…

mothers day frames 2

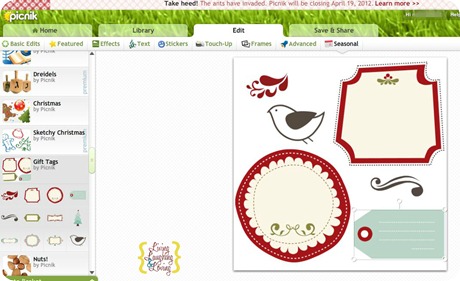
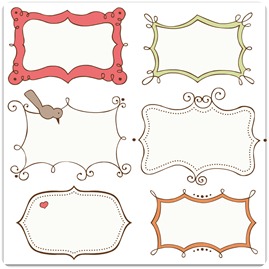
I also like the Tags in the Seasonal Section under Holiday!

seasonal gift tags 2

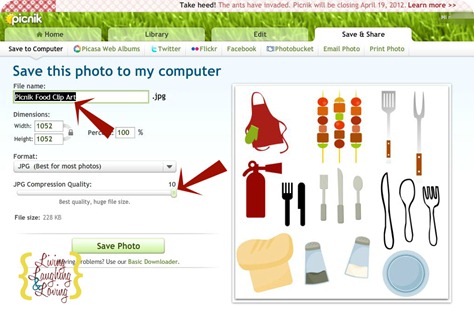
Step 5… Now we gotta save.  Choose the saving size all the way up to 10 since we want it as big as possible, and name it something descriptive.  It may help to have them all start with the word Picnik and include in the name the category of clip art… such as, “Picnik Food Clip Art.” 

save change size make descriptive name 2

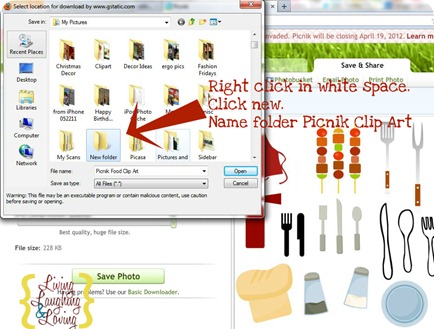
Another tip?  You can right click anywhere in the white space of the pop up window and click “New” and then “Folder” to create a new and special Picnik only folder.  Name it something like “Picnik Clip Art” and save all your faves there so you’ll be able to find them again.

create new folder 2


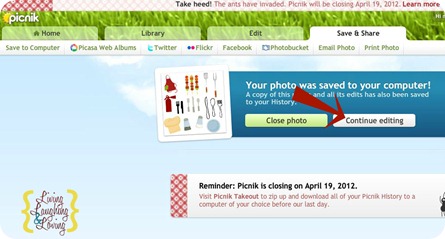
Once you’ve saved it, you don’t have to start from scratch to save more stickers.  Just click Continue Editing…

cont editing 2

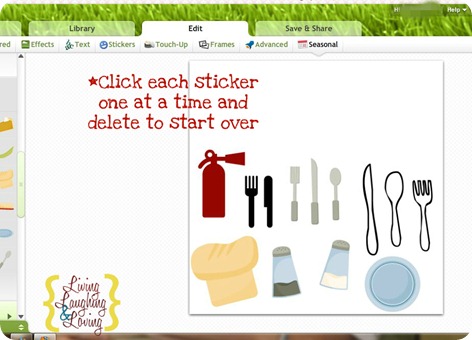
And one by one, click each sticker and delete them until you have a blank page again.

click and delete stickers to start over 2

If you’re smart, I guess you could save your blank page at that point, and have that as your starting point too.  :)

NOW THEN!

Once you’ve saved all the ones you can’t possibly live without, what are you supposed to DO with them?

Since you have them organized and saved on your computer, whenever you think you might need one of those individual images, you can upload and crop them in picmonkey!  {Or whatever other photo editing site you like!}

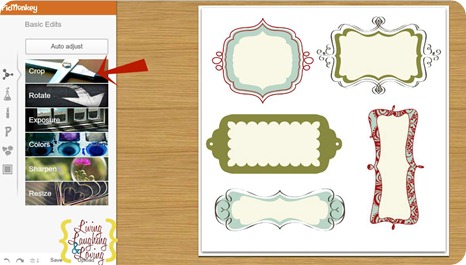
Click Crop…

crop in picmonkey 2

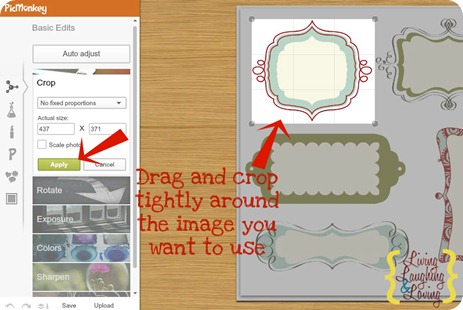
And crop tightly around whatever image you need and click apply.  You want as little of the white space around it as possible.

crop to size 2

Voila! Now you have that image separate and ready to go!

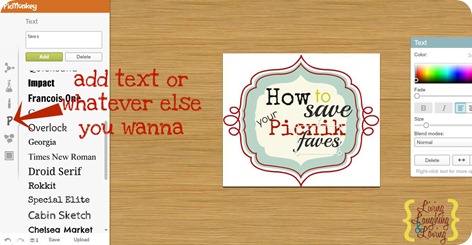
Just add your text or whatever else you’d like. 

add text in picmonkey 2

Picmonkey has a limited amount of stickers at this point, but in the meantime, we’ll have our Picnik sticker stash to tide us over.  {If only picmonkey had a photobasket option! Ah!}


So what do you think??  Sound like a good plan for coping with our upcoming Picnik loss?  Less than a MONTH until poor Picnik is no more!

As a thank you to all of you wonderful peeps, and to save you some time and effort, I’m sharing the ones I picked out with YOU!   Woot! 

Now you’ll just have to follow the steps above to save any of your favorites that I didn’t catch.  :)

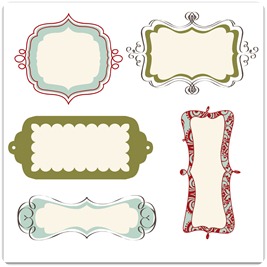
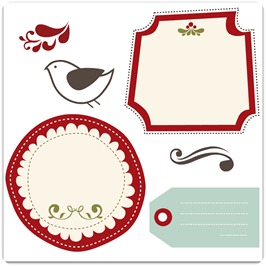
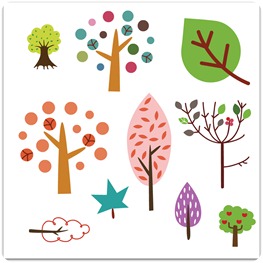
Picnik Food Clip Art Picnik frames and springPicnik frames  Picnik Tags 2Picnik Tags   Picnik whimsey trees

Just click the images to enlarge, right click and choose save image as

If you do choose to download these, I would LOVE it if you would subscribe or join me on facebook!  It would be great to see more of you! 

It’s most certainly not a perfect Picnik solution, but it’s making the loss just a bit easier to cope with for me!! 

What photo editing site do you plan to switch to?


feelscript sig smiley

*Sometimes I link up at these parties… Weekend Bloggy Link up, Tatertots & Jello, House of Hepworths,Bowl Full of Lemons,Organize & Decorate Everything, Not Just a Housewife, Funky Junk Interiors, Somewhat Simple, Shabby Creek Cottage,No Minimalist Here, Skip to my Lou,Today’s Creative Blog, the 36th Avenue, Thrifty Décor Chick, Home Stories A-Z, Five Days Five Ways, How to Nest for Less, and Someday Crafts. You should check ‘em out!!

23 Responses to Beautify your Blog… How to Save your Picnik Faves
  1. Bethany
    March 16, 2012 | 9:48 am

    THANK YOU! Seriously…I was dreading losing everything!

  2. Christina @ The Frugal Homemaker
    March 16, 2012 | 2:30 pm

    Oh, wow, Renee! this is awesome! Not only am I seeing stickers that I didn’t even know they had (probably cause when I checked the stickers out last the premium ones weren’t available to me).

    But now I have a way to save them too, in case Picmonkey gets shut down (and I am with you on being scared they will – just seems like a huge lawsuit waiting to happen :(

    or if they never add some of the same stickers :)

    and THANK YOU so much for the freebies for us to save! :)

  3. Shirley@motivatedmommyoftwo
    March 16, 2012 | 3:48 pm

    THANK YOU!!! so much for this wonderful tutorial. I love Fridays when I get to read and try out new things for my blog. I already follow you on Facebook so I guess I am OK to download the images you provided.
    I already bookmarked picmonkey and will start messing around with it tonight when I start editing some pictures. I will for sure miss Picnik too it was an awesome tool for us novice who have no idea how to use photoshop.

  4. Paula
    March 16, 2012 | 4:06 pm

    Thanks so much for this tip. I am going to check out picmonkey!

  5. Sarah Hefner
    March 16, 2012 | 5:02 pm

    This is awesome! Thanks so much for all your helps. I love how easy you make it all – with pictures and everything!

  6. Carrie @ The Internet Made Me Do It
    March 16, 2012 | 11:27 pm

    Thank You! I was dreading leaving Picnic, and although the interface of PicMonkey was great – it does not have the clip art fun that made picnic so lovable! My hat off to you – what a great idea!!

  7. Alecia @ ChickenScratchNY
    March 17, 2012 | 9:20 am

    Thank you! Thank you! Thank you! I use 2 of their stickers for just about everything and I didn’t know what I was going to do with out them!

  8. amy
    March 17, 2012 | 3:52 pm

    This is great!! And thanks for saving us some of the work and sharing yours! ;) I have a question, though, what if you want the sticker on a non-white background later on? Like if you’re making a button or using it in your header, kwim?
    Anyway, would you share this here?
    http://oneartmama.blogspot.com/2012/03/shine-on-fridays-19-and-some-fabulous.html

    • Renee
      March 21, 2012 | 9:35 pm

      Unfortunately it will always have that white around it unless you have photoshop to remove it.
      That’s why it’s best to crop it closely as possible. so there’s as little of the white space as possible. :)

  9. Homeroad
    March 18, 2012 | 7:41 am

    Thank you so much for the information! I’m following!
    Susan

  10. Samantha
    March 19, 2012 | 8:50 am

    Visiting from Serenity Now–Wow! You are a rockstar! I am going to follow! Thanks for organizing all the clip art from Picnik. I am in mourning that the site is closing. But I am hopeful Pic Monkey might be a good replacement. Tonight my linky party “Cowgirl Up!” goes live. It is a linked linky, so post once and your link appears on four blogs. Hope to see you and your Picnik tips tonight!
    :) Samantha

  11. Holly
    March 19, 2012 | 3:40 pm

    You are super amazing!!! Love this and saved them all. Thank you, thank you!!

  12. Tamara @ Etcetorize
    March 26, 2012 | 1:53 pm

    You are so crafty! Very smart idea~

  13. Shannon
    March 27, 2012 | 2:52 pm

    Thanks you! I am so sad about picnik closing too! This does help a bit :)

    Shannon Tracy
    The Enchanted Yankee
    enchantedyankee.wordpress.com

  14. Shannon
    March 27, 2012 | 6:11 pm

    I also just saw when I went to picmonkey, collages coming soon! Hope a photobucket comes with it! Woot.

    Shannon Tracy
    The Enchanted Yankee
    enchantedyankee.wordpress.com

  15. Kate
    March 29, 2012 | 10:08 am

    Wow, thanks! I love Picnik’s clip art and just never thought of saving them. In Photoshop Elements I can use the magic wand to select them and get an even tighter crop! I know what I need to do this weekend… : )

  16. Kate @ A Creative Cookie
    March 30, 2012 | 6:03 pm

    This is great! Right after they announced that they were closing, I had started doing this! I have pages and pages of clip art to use in the future! Where did you get those other frames besides the ones in the Mother’s Day section?
    Thanks!

    • Renee
      April 3, 2012 | 7:57 am

      I think all the other frames came from the Seasonal Holiday section. There are tons of the holiday ones, but if you keep scrolling down you should see some labeled “tags” I think. :)

  17. Claire
    March 30, 2012 | 9:47 pm

    This is another excellent tutorial for something I never would have thought to do. Ever since I learned to watermark from your blogging tips I’ve never looked back! Thank you so much for your generous downloads. I’m looking forward to finding out what they add to PicMonkey in the days to come.

    Thanks,

    Claire @ alittlesomethinginthemeantime.blogspot.com

  18. Javi
    April 2, 2012 | 3:40 pm

    Thank you thank you! I was going to die if I didn’t find another website like Picnik bc I use it to edit my fanarts. You saved me!

  19. […] How to Save Your Picnik Sticker Favorites by Living, Laughing & Loving. […]

  20. Andrea
    April 3, 2012 | 11:56 am

    Thanks so much for this tip.

  21. Amanda
    April 7, 2012 | 6:21 am

    This is such a fantastic idea, thanks for thinking of it and sharing with us!

Beautify your Blog… How to Save your Picnik Faves

beautifyyourblog keep picnik 2

Last week on our DIY Blog Beautifying Journey, I promised a Picnik Loss Coping Tip, but first, here are all the AMAZING things we’ve covered so far…

Fabulous Fonts

DIY Quote Box

Dreamy Header

Adding a Custom Menu Bar

Sensational Signature w/Graphics

Sharing a Comment Pic thru Gravatar

Customized Sidebar Titles

Top WordPress Plugins

Easy Watermark Image

Promote your Blog with Email Siggy

Customized Favicon

I don’t know why google hates me, but for some reason, it seems they might!  They announced earlier this year that they were going to be closing Picnik and that sent all of blogland into a tither. 

Apparently it’s what all of us posers use to try to pretend that we’re as cool as those photoshop people.  :)

My sister keeps telling me I need to get on the Photoshop bandwagon, but it’s just so hard, dog-gone-it! 

I loved how easy picnik was! 

After the announcement, blog posts were flying about with recommendations on a picnik replacement complete with tutorials and examples.

But none of them came close to our beloved Picnik! 

In the spirit of capitalism, some supposedly former employees of Picnik saw the outcry and decided to start a very picnik-esque photo editing site… PicMonkey

I mentioned Monday how very similar it really is to Picnik… so much so that I’m scared that the giant google claws will stretch out and smash them before we even get a chance to  make use of it! 

One part of our pain in losing Picnik  is losing the easy access to all the extra fun embellishments that add a special touch especially when you are creating a button or graphic. 

I decided that I would join the revolution that the picmonkey peeps started and try to hang onto whatever Picnik goodness I can before it’s all gone.  :)

Ready to see exactly how to do that?

Step 1… Go to Picnik and open a collage.  They made this really hard to figure out since they added their ‘we’re closing’ page. Click on the Library tab, and then Start at the far left.

click library and start 2

Then click Make a Collage.

click collage 2

Change the color to white and click Done.

change color 2

Click done 2

Step 2… Add a frame to see where your edges are.  This isn’t necessary of course, but makes it much easier.  Choose your frame and click apply.

add a frame 2

Step 3… Now click stickers to show all your many options.

click on stickers 2

Pick your favorites and click away.  Obviously it’s not feasible to save ALL the stickers, but we can easily save some of our faves!

pick which stickers to save 2

Remember to enlarge them as big as you’ll think you may need them.  You can always go smaller, but it ain’t so easy to go bigger.

You should also leave plenty of room around each one too, so you’ll be able to crop easily later, and don’t forget to change any colors now.

Step 4… Check the seasonal sections for more super stickers.  I grouped like ones together too for easier organization.

click on seasonal for more stickers 2

Do you like how I added the fire extinguisher for my cooking theme?  :)

Some of my other faves are the Mother’s Day frames and flowers…

mothers day frames 2

I also like the Tags in the Seasonal Section under Holiday!

seasonal gift tags 2

Step 5… Now we gotta save.  Choose the saving size all the way up to 10 since we want it as big as possible, and name it something descriptive.  It may help to have them all start with the word Picnik and include in the name the category of clip art… such as, “Picnik Food Clip Art.” 

save change size make descriptive name 2

Another tip?  You can right click anywhere in the white space of the pop up window and click “New” and then “Folder” to create a new and special Picnik only folder.  Name it something like “Picnik Clip Art” and save all your faves there so you’ll be able to find them again.

create new folder 2


Once you’ve saved it, you don’t have to start from scratch to save more stickers.  Just click Continue Editing…

cont editing 2

And one by one, click each sticker and delete them until you have a blank page again.

click and delete stickers to start over 2

If you’re smart, I guess you could save your blank page at that point, and have that as your starting point too.  :)

NOW THEN!

Once you’ve saved all the ones you can’t possibly live without, what are you supposed to DO with them?

Since you have them organized and saved on your computer, whenever you think you might need one of those individual images, you can upload and crop them in picmonkey!  {Or whatever other photo editing site you like!}

Click Crop…

crop in picmonkey 2

And crop tightly around whatever image you need and click apply.  You want as little of the white space around it as possible.

crop to size 2

Voila! Now you have that image separate and ready to go!

Just add your text or whatever else you’d like. 

add text in picmonkey 2

Picmonkey has a limited amount of stickers at this point, but in the meantime, we’ll have our Picnik sticker stash to tide us over.  {If only picmonkey had a photobasket option! Ah!}


So what do you think??  Sound like a good plan for coping with our upcoming Picnik loss?  Less than a MONTH until poor Picnik is no more!

As a thank you to all of you wonderful peeps, and to save you some time and effort, I’m sharing the ones I picked out with YOU!   Woot! 

Now you’ll just have to follow the steps above to save any of your favorites that I didn’t catch.  :)

Picnik Food Clip Art Picnik frames and springPicnik frames  Picnik Tags 2Picnik Tags   Picnik whimsey trees

Just click the images to enlarge, right click and choose save image as

If you do choose to download these, I would LOVE it if you would subscribe or join me on facebook!  It would be great to see more of you! 

It’s most certainly not a perfect Picnik solution, but it’s making the loss just a bit easier to cope with for me!! 

What photo editing site do you plan to switch to?


feelscript sig smiley

*Sometimes I link up at these parties… Weekend Bloggy Link up, Tatertots & Jello, House of Hepworths,Bowl Full of Lemons,Organize & Decorate Everything, Not Just a Housewife, Funky Junk Interiors, Somewhat Simple, Shabby Creek Cottage,No Minimalist Here, Skip to my Lou,Today’s Creative Blog, the 36th Avenue, Thrifty Décor Chick, Home Stories A-Z, Five Days Five Ways, How to Nest for Less, and Someday Crafts. You should check ‘em out!!

23 Responses to Beautify your Blog… How to Save your Picnik Faves
  1. Bethany
    March 16, 2012 | 9:48 am

    THANK YOU! Seriously…I was dreading losing everything!

  2. Christina @ The Frugal Homemaker
    March 16, 2012 | 2:30 pm

    Oh, wow, Renee! this is awesome! Not only am I seeing stickers that I didn’t even know they had (probably cause when I checked the stickers out last the premium ones weren’t available to me).

    But now I have a way to save them too, in case Picmonkey gets shut down (and I am with you on being scared they will – just seems like a huge lawsuit waiting to happen :(

    or if they never add some of the same stickers :)

    and THANK YOU so much for the freebies for us to save! :)

  3. Shirley@motivatedmommyoftwo
    March 16, 2012 | 3:48 pm

    THANK YOU!!! so much for this wonderful tutorial. I love Fridays when I get to read and try out new things for my blog. I already follow you on Facebook so I guess I am OK to download the images you provided.
    I already bookmarked picmonkey and will start messing around with it tonight when I start editing some pictures. I will for sure miss Picnik too it was an awesome tool for us novice who have no idea how to use photoshop.

  4. Paula
    March 16, 2012 | 4:06 pm

    Thanks so much for this tip. I am going to check out picmonkey!

  5. Sarah Hefner
    March 16, 2012 | 5:02 pm

    This is awesome! Thanks so much for all your helps. I love how easy you make it all – with pictures and everything!

  6. Carrie @ The Internet Made Me Do It
    March 16, 2012 | 11:27 pm

    Thank You! I was dreading leaving Picnic, and although the interface of PicMonkey was great – it does not have the clip art fun that made picnic so lovable! My hat off to you – what a great idea!!

  7. Alecia @ ChickenScratchNY
    March 17, 2012 | 9:20 am

    Thank you! Thank you! Thank you! I use 2 of their stickers for just about everything and I didn’t know what I was going to do with out them!

  8. amy
    March 17, 2012 | 3:52 pm

    This is great!! And thanks for saving us some of the work and sharing yours! ;) I have a question, though, what if you want the sticker on a non-white background later on? Like if you’re making a button or using it in your header, kwim?
    Anyway, would you share this here?
    http://oneartmama.blogspot.com/2012/03/shine-on-fridays-19-and-some-fabulous.html

    • Renee
      March 21, 2012 | 9:35 pm

      Unfortunately it will always have that white around it unless you have photoshop to remove it.
      That’s why it’s best to crop it closely as possible. so there’s as little of the white space as possible. :)

  9. Homeroad
    March 18, 2012 | 7:41 am

    Thank you so much for the information! I’m following!
    Susan

  10. Samantha
    March 19, 2012 | 8:50 am

    Visiting from Serenity Now–Wow! You are a rockstar! I am going to follow! Thanks for organizing all the clip art from Picnik. I am in mourning that the site is closing. But I am hopeful Pic Monkey might be a good replacement. Tonight my linky party “Cowgirl Up!” goes live. It is a linked linky, so post once and your link appears on four blogs. Hope to see you and your Picnik tips tonight!
    :) Samantha

  11. Holly
    March 19, 2012 | 3:40 pm

    You are super amazing!!! Love this and saved them all. Thank you, thank you!!

  12. Tamara @ Etcetorize
    March 26, 2012 | 1:53 pm

    You are so crafty! Very smart idea~

  13. Shannon
    March 27, 2012 | 2:52 pm

    Thanks you! I am so sad about picnik closing too! This does help a bit :)

    Shannon Tracy
    The Enchanted Yankee
    enchantedyankee.wordpress.com

  14. Shannon
    March 27, 2012 | 6:11 pm

    I also just saw when I went to picmonkey, collages coming soon! Hope a photobucket comes with it! Woot.

    Shannon Tracy
    The Enchanted Yankee
    enchantedyankee.wordpress.com

  15. Kate
    March 29, 2012 | 10:08 am

    Wow, thanks! I love Picnik’s clip art and just never thought of saving them. In Photoshop Elements I can use the magic wand to select them and get an even tighter crop! I know what I need to do this weekend… : )

  16. Kate @ A Creative Cookie
    March 30, 2012 | 6:03 pm

    This is great! Right after they announced that they were closing, I had started doing this! I have pages and pages of clip art to use in the future! Where did you get those other frames besides the ones in the Mother’s Day section?
    Thanks!

    • Renee
      April 3, 2012 | 7:57 am

      I think all the other frames came from the Seasonal Holiday section. There are tons of the holiday ones, but if you keep scrolling down you should see some labeled “tags” I think. :)

  17. Claire
    March 30, 2012 | 9:47 pm

    This is another excellent tutorial for something I never would have thought to do. Ever since I learned to watermark from your blogging tips I’ve never looked back! Thank you so much for your generous downloads. I’m looking forward to finding out what they add to PicMonkey in the days to come.

    Thanks,

    Claire @ alittlesomethinginthemeantime.blogspot.com

  18. Javi
    April 2, 2012 | 3:40 pm

    Thank you thank you! I was going to die if I didn’t find another website like Picnik bc I use it to edit my fanarts. You saved me!

  19. […] How to Save Your Picnik Sticker Favorites by Living, Laughing & Loving. […]

  20. Andrea
    April 3, 2012 | 11:56 am

    Thanks so much for this tip.

  21. Amanda
    April 7, 2012 | 6:21 am

    This is such a fantastic idea, thanks for thinking of it and sharing with us!